Feeds:
Posts
Comments

Archive for the ‘Frugality’ Category

My chard (also known as swiss chard and silverbeet) is growing great right now. I planted it last fall, and it did ok throughout the winter months, but it seems to really have taken off in the past months. I have known that I need some shade for my garden in the spring and summer months. That South Texas sun is just too darn hot for most things all day long. While I have a nice line of juniper trees on the east side of the garden I have nothing shading things from the West side and as the hours go by the plants really take a beating. I have tried to come up with some ideas (in my head!) to help shade things, but my limitations over the past few years I haven’t been able to physically get things done like that. This year I had some ideas that I thought would work and I have more stamina to get them done.
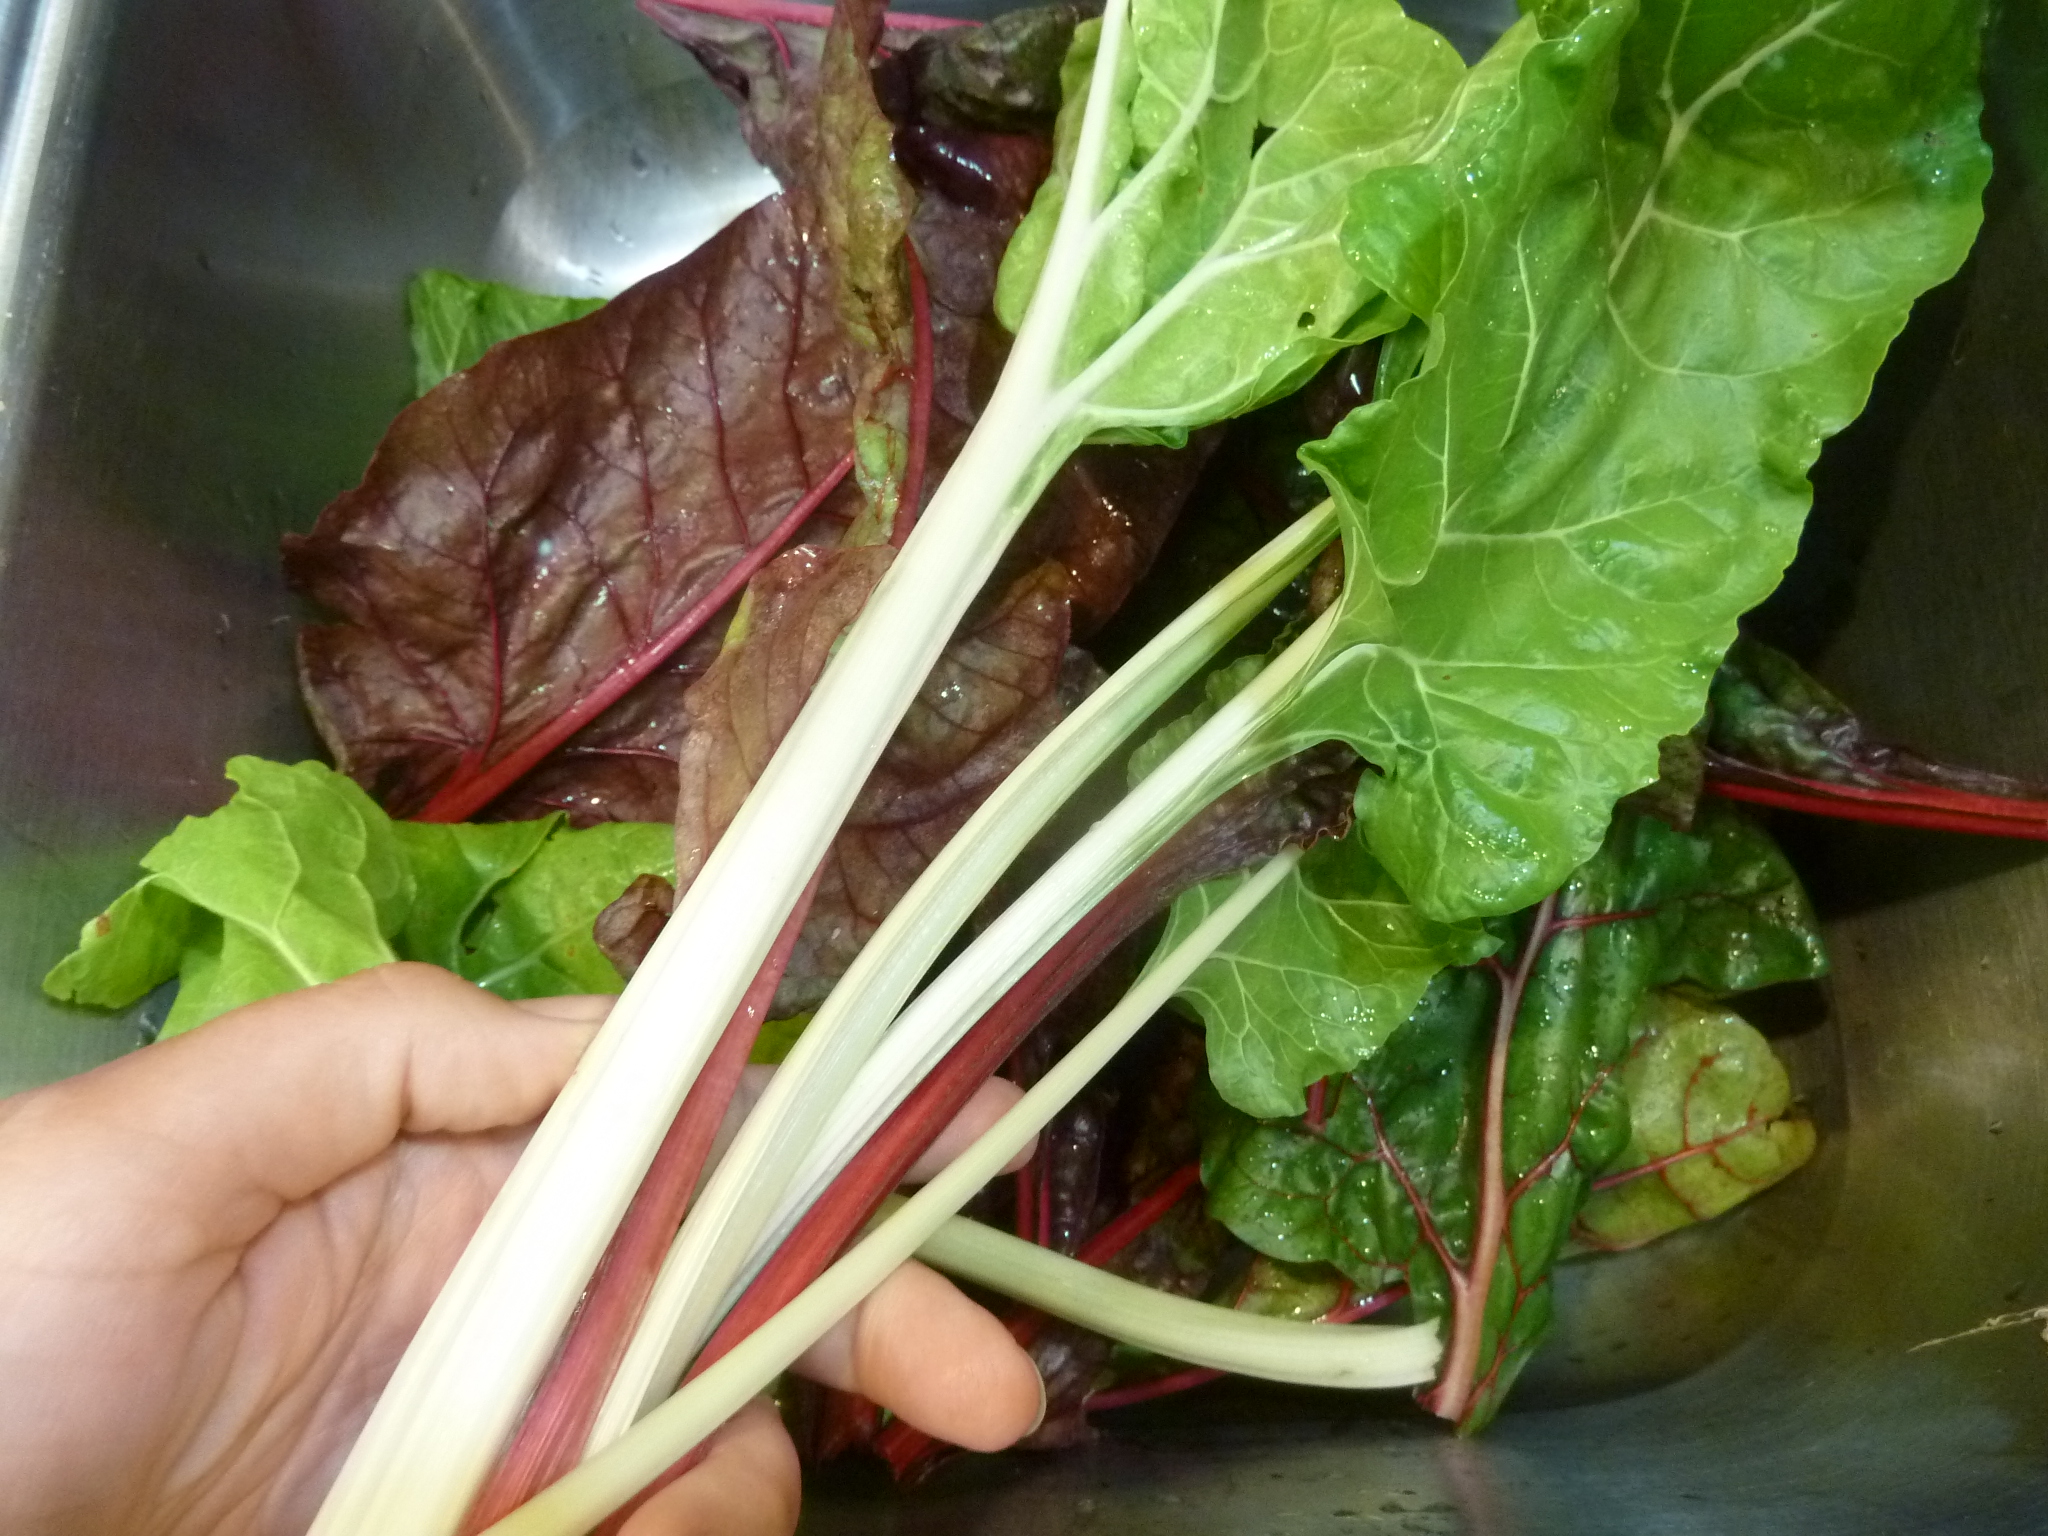
Chard stalks

Chard stalks

I’m getting off track here. This post started out about chard and the stems and I have gotten sidetracked with my new shade system….. so I will break this up into two posts and post about the shade that I created in my next post here.

I think my chard is really benefiting from the shade and when I arrived back home after being gone for 3 weeks I was amazed at how tall and full the chard plants where. It is really almost impossible to grow most greens here in the spring and summer months. For two years I did keep a few chard plants going. It wasn’t pretty throughout the summer months, nor were they huge producers, but it was interesting to see them stay alive and keep growing.  I am excited at the prospect of these fall planted chard plants along with the new shade to see what happens throughout the rest of the summer. We are already hot, and it will just get more hot and I hope the plants will do better.

chopping chard stalks

chopping chard stalks

So, I am happily picking chard and adding into most of our meals in one way or another. Last night as I was chopping the chard and I wondered if others out there also ate the stalks/stems.

Adding chopped chard stalks to pasta water

Adding chopped chard stalks to pasta water

I grew up eating the stalks. Mom or Gram would chop them separately and get them sauteing or steaming for a few minutes. The stalks can be a bit bitter and that bitterness will disappear if you give them extra time to cook. they also need additional cooking time because they are a lot thicker and firmer than the leaf and need that extra time to soften up more.

When I am going to add the chard to pasta, I just throw the chopped stalks in along with the pasta for the last 3 minutes of its cooking time. Once the pasta is drained I add the chopped leaves and let the heat of the pasta soften and cook the delicate chard leaves (the smaller you chop them up, the easier it is to incorporate them into the hot pasta.)

Do you eat the chard stalks? How do you incorporate them into your meals?

Sincerely, Emily

Read Full Post »

I am really tired of throwing away good money on cat scratching posts that don’t hold up very long. I have thought about re-covering the old, tattered, worn out ones for way too long….  I finally decided to do something about it.

in need of a makeover

in need of a makeover

The two girls have been really good about using the cat scratching posts over the course of their 13 years, until recently. One of them has decided to use the corner of a chair, so I have four cat scratching posts in that area AND SHE STILL GOES TO THE CHAIR! There is another scratching post in our bedroom that she uses A LOT and that is the one you see in the photo. It is long overdue for a makeover!

I removed most of the original sisal rope

I removed most of the original sisal rope

Why would I want to take the time to re-cover these scratching posts?

  • Frugal
  • It is really easy to do
  • Recycling some of the old (Yes I still had to buy the rope)
  • I am tired of spending money on something that doesn’t last very long anymore. (Scratching posts used to cost $20 or less, now they are closer to $30+


making progress

making progress

Supplies I needed:

  • Sisal rope
  • wood glue
  • blue painters tape or masking tape

I started by removing most of the older rope. I unwound the new sisal rope before I started so I wouldn’t be fighting with it as I needed it. Right away I could tell this was going to be a job that would go faster with three hand…. but I only have two. I applied glue to the round tube a little at a time. If I tried to glue a section, I just managed to get glue on my fingers and dripping off the tube, so i just glued enough to wrap the rope around once, hold it in place with my hand, then glue another ring.

When I would get a 6″ section done, I would then take the tape and go over it to help hold the rope in place until the glue dried. I am not sure I needed to tape the entire post, I could have used the tape every 3″ up the post and been fine I think. I will have to try that on the next post (I have a few more to do!)

Done!

Done!

I feel pretty good about how this project turned out. I fell better about being able to re-use most of the original scratching post and keep it out of the landfill. I also feel good about most of the supplies I used. I will take a bit more time to see if I can source some sisal rope made in the USA.

Have you taken on a project lately that has saved you money?

Sincerely, Emily

Read Full Post »

As it warms up in my area, I am already starting to notice fruit flies in the kitchen. I certainly don’t miss having hem around in cooler winter months! They aren’t out in full force yet, but I know it won’t be long.

I understand the temptation for them with all the fermenting experiments on the count, so it isn’t like I a surprised they are around, but it just gets hard when you do to take a drink of something like ginger beer  and find a fruit fly floating in the glass AGAIN!

Last summer I tried a few experiments to try to control their numbers. This is the one that I found that worked best.

Fruit fly trap

Fruit fly trap

I took a smaller sized mason jar and put some ginger beer in it (you can use anything sweet and tempting to a fruit fly – even cut up fruit.) Then I covered the jar with a piece of paper and secured it to the jar with a rubber band making sure that it was tight around the jar (no gaps at all). Next, I poked holes in the top with a larger needle. The holes needed to be big enough for the fruit flies to get in, but not get out.

I tried this with plastic wrap at first but if I poked a hole to big that was non productive and I also noticed that after a few fruit flies were trapped in there, that was it, no others seemed to try. That is why I switched to paper, thinking the fruit flies on the outside couldn’t see the ones on the inside and still try to get into the trap. The paper seemed to work really well.

Fruit Fly trap 1The only downfall I have noticed is, that once you have a ton of fruit flies in there, how do you kill them and get them out without taking the paper off (the lies one fly away!) I managed to shake up the jar enough to get them all wet and then empty it at the sink where I could rinse everything down with water before they had a chance to dry off and fly away. Another option is to set the jar outside and forget about it (yup, I did that) until they all die, then take the paper off and clean out your jar.

I had more than one trap going in the kitchen at a time and switched them out often for a fresh one. I realized that I needed fresh ginger beer in their to keep attracting them into the trap.

Have you made a fruit fly trap that works well for you? Please share you experiences in the comments.

Sincerely, Emily

Read Full Post »

It seems that my list of bookmarks on my computer just keeps getting longer and longer, and I just keep adding to it. The bookmarked things ranges for herb websites to blogs of all sorts, recipes and crafty things I would like to try. (ya, I have heard of pinterest, and I should probably use it more, but it seems I get lost in time when ever I log in there)

Every time I bookmark something it ends up at the bottom, and the bottom seems to be pages and pages down there, so I started working on organizing the bookmarks and as I did that I came across things I had forgotten about (what a concept!)… so I decided to try to either do something, like a craft, each week or try a recipe or read a certain blog I bookmarked but never got back to.

I have a lot going on right now, so I picked a few simple things that wouldn’t take up too much time. I started with a bookmark. I figured it would be perfect for my niece that had a birthday this week. This was a super frugal gift, because I used some of those left-over scraps of paper that I save. I found the original on The Girl Creative.Book marks 1I tweaked the pattern for me and simplified it. The original bookmarks are cute, but my niece is 11, and I wanted something a bit more tailored for her.Book marks 3I picked out some designer card stock/scrap-booking papers that I thought that she would like (blues and greens) and made a few. Another niece likes hot pink and animal prints, so I made a few for her at the same time.Book marks 5This was a quick and easy project for me to do and it felt good actually getting around to one of those things I had bookmarked off the internet.

Do you have a long list of bookmarked things? How do you organize them?

Do you ever have things you want to try? Do you ever get around to them?

Sincerely, Emily

Read Full Post »

I have been a member in a Culinary group for the past 2+ years and it has been a lot of fun. We get together once a month and have herb-themed culinary meetings. Our group has been full and there have been many members of the Herb Society that would like to join our group, but we limit it to 15 members since we have sit-down dinners and rotate house. So, a friend and I have mentored a new Culinary group. We officially started the meetings in November. the first meeting was a general meeting, bring a dish to share (no theme) and talk about the guidelines and ideas of getting the new group off the ground and in the right direction. For the December meeting the original Culinary group invited the new Culinary group to our annual cookie exchange. That was a big hit with over 20 people attending (appetizers, not sit-down meal!)

Note: for those of you that know me, you might want to be sitting down to see some of the photos in this post! Seriously!

Goat Cheese - Thyme - Caramelized Onion Crostini Canape - EmilyTonight, I hosted the first themed meeting. Our theme was thyme and everyone brought a dish using thyme. I enjoy having people to house, but I am guilty of never having a clear surface to place anything and that involves time and planning on my part to get the house in order. I have had since the end of November! I did it!

clean house 1This all fits right in to the January Cure that Xan has been posting about. I can’t seem to find time to post on a regular basis on my personal blag, I can’t seem to find the time to read up on all the blogs I enjoy reading, and I can’t seem to find the time to even read the January Cure posts. I’m and very frugal with our money and don’t buy luxury-type items, so I am with Xan and don’t agree with buying fresh cut flowers each weekend. I do not need fresh flowers to feel good. My mom did send me flowers over 2 weeks ago, and I am still enjoying them. Last week I also bought flowers for my neighbor/friends as a thank you for picking up groceries, but also, I know they are sad with the passing of their son and the flowers sure perked them up. That makes me feel good!

Clean table 1Over the past few weeks, I have methodically focused on clearing some of my clutter. In the end, I only shoved a few things in drawers that I couldn’t quite get through. I was expecting 14 people and the house looks really good! I dealt with a lot of paper work. Recycled a lot of paper. Put a lot of things away (where I hope that I will find them again!)

As the day went on, 14 dropped to 4. How they heck do you go from expecting 14 people down to 4! Freezing rain! Yes, we get there here in San Antonio from time to time…. this was one of those times. We had a good time talking about thyme and visiting.

Here is my creation for the thyme-themed meeting tonight. I went with an appetizer – because I was spending all my time and energy cleaning the house, I wanted to keep it simple and easy to make. It was a success!

Goat Cheese – Thyme – Caramelized Onion Crostini Canape

  • 8 oz Goat Cheese – room temperature (you can use cream cheese if you prefer)
  • 3-4 T Sour Cream or Yogurt
  • 2 T Dried Thyme
  • Crostini or Crackers
  • Onions – caramelized

Bring your goat cheese up to room temperature so it is easier to work with.

Slice or dice onion and caramelize it in a fry pan. If you want to sweeten your onions a bit more, add a bit of sugar are you caramelize them.

While onions are caramelizing, mix goat cheese, sour cream/yogurt and thyme together. Use as much sour cream/yogurt as you need to create the consistency you like.

Cut your bread in sizes/shapes that you want and toast it. Set aside to cool.

Spread crostini with goat cheese mixture.

Top with caramelized onions.

Serve at room temperature.

All elements of this appetizer can be made ahead of time. Just pull them out of the refrigerator and allow them to come up to room temperature, and assemble them right before you guest arrive.

I guess this evening fit in with the January Cure – Plan a get-together. We also have some friend coming over for dinner in a few weeks…. I sure hope the house looks this good when that rolls around!

Do you have any house cleaning/organizing projects that you are working on?

Sincerely, Emily

Read Full Post »

I graduated from college with a degree in Art/Interior Design, so what I am about to show you is rather scary, but keep in mind that I just don’t care. What I mean is, I care about you, just not about what I am about to show you…

hot pink pants (great garden pans!) and very comfortable maroon sweatshirt

hot pink pants (great garden pans!) and very comfortable maroon sweatshirt

Actually I do have a good sense of what colors go together, you just can’t tell by what I am wearing when I work in the yard most of the time…another colorful outfit

The pink shorts (above photo) I bought on purpose many years ago. I bought the maroon sweatshirt on purpose many years ago too.

Those hot pink pants (above) were the perfect thrift store fine. Perfect for the garden. The blue windbreaker was another thrift store find, complete with a casino logo on it from California.

The army green muck boots – I really wanted the lime green ones at Fleet Farm up in Wisconsin, but they didn’t have my size. That really would have made my outfits complete! Right?

I know one person out there reading this is rolling her eyes right now. Her name starts with a “G” and I know she is thinking “What has happened to her?” (now that she has just read this last sentence, she is laughing – I hope!

I just want to say… I don’t go out in public wearing these clothes…. these are strictly yard clothes and I think that they are great yard clothes!

The neighbors don’t even seem to bat an eye (at least not in my presence!)

He helps with with the laundry

He helps with with the laundry

It is kind of funny that when I found Wocket and immediately brought him home (thrift store find). After all, he has the same fashion sense that I do when working outside.

Sincerely, Emily


Read Full Post »

I went to my first swap this past April. I had heard of swaps but didn’t find one in my area until a friend found this one on a MeetUp page and told me about it.

Swap July 2013

Swap July 2013

The organizer set up a few guidelines and the rest is history. She holds it once a month.

There were a few guidelines to follow:

  • No money was allowed – this is all about the trade and bartering with what you have for what you want/need.
  • Items should be sustainably-minded. Something you have grown in your garden, something you conned/cooked/brewed/baked/preserved/dried, etc. Something your animals made (goat milk, hen eggs, lamb wool, etc.) Something you sewed/knitted/re-purposed, etc. Items to do with sustainable interests are also good (Mother Earth News magazines, cookbooks, cooking/camping gear, etc)
  • The items you should leave at home: this is not a garage sale, items should be about sustainability. Leave the knick-knacks at home.

Once we set up, we were allowed 15 minutes to walk around and check out the items other people brought so we could see what we were interested in.

Lemon pickles, Dill pickles, Homemade Teriyaki sauce

Lemon pickles, Dill pickles, Homemade Teriyaki sauce

Each month I have been posting about the swap over on my personal blog. About a month ago I realized that I hadn’t posted about the July swap and I thought it would be a good topic to post here. I have known the swap and barter system is out there and alive, and I realize that there may be others out there that are interested, but don’t know were to look or even how to get started.

Here are the other swap posts I have done”

Here are a few places to look to find swaps in your area: Note: I will add additional information to this post as I find it or as people comment. (updated 19 Sept 2013)

Would you go to a swap if you had one in your area?
Are you participating in a swap in your area?

Please use the comments to let others know about how to find a swap. If you out there participating in a swap, please comment with the general area you are in and add a link to the swap information.

Sincerely, Emily

Read Full Post »

This past Sunday our Sunday Photo post focused on “Flour Power.” Well, flour has definitely taken on power, and new meaning for me in the past five years.

On my journey to rid our kitchen of processed and pre-packaged food, I have also taken some detours and now local food plays a very important part of this journey as well.  Granola Bars 1

Flour, also gives me freedom. The freedom and power to make things like bread and pizza dough. Crackers and muffins. Sour dough starter and white sauce. I know where my flour came from and I know what the ingredients are in the things I make. Not only do I know the ingredients, but making these things is also frugal. I know it costs a lot less then buying a loaf of bread at the market.bread dough

In Sunday’s post Alexandra talked about finding local flour in Wisconsin a few hours from where she lives. I finally found a source for wheat in Texas that is about 500 miles away. YIKES. Texas is fifth in the nation in wheat production, and it is hard to find wheat or flour locally. Hmmm. Fran talked about flour and its connection to communities.KPMF on toast with asaragusOn any given day, I usually eat something that I eat that has flour in it. Toast made from homemade bread to go with my morning eggs. Maybe a granola bar in the car on the go. Last week for dinner I made a mushrooms in a white sauce using flour, served if over toast and topped that off with steamed asparagus.

Flour is one of the staples that I would never want to be without in my cupboards because it plays an important part in our meals. I am grateful that I have the time to make these things at home.

What part does flour play in our kitchen and life?

Sincerely, Emily

You can see what else I am up to over at Sincerely, Emily. The topics are varied, as I jump around from gardening to sewing to making bread or lotion and many things in between.

Read Full Post »

I have vivid memories of the different sets of salt and pepper shakers that our family used when I was growing up. I have a few of them at our home and it is fun to use them, but there are a few that go unused because I haven’t been able to find a cork or rubber stopper the right size to fit the opening at the bottom.

The Danish salt shaker I used growing up

The Danish salt shaker I used growing up

Pepper shaker - cork won't fitA few months ago, I had another one of those “ah-ha” moments.

I went into my dresser drawer and pulled out a fresh set of expandable foam earplugs. It was the perfect solution!!!

I didn’t use the whole foam earplug. I cut it in half, lengthwise and was able to make two stoppers out of it and use half in another shaker. Use a clean ear plugWhat a deal!

One of the great things about using the expandable foam is that it will fit any size opening, unless you have an opening that is rather large.

If you head over to Sincerely, Emily you can see another cute salt and pepper shaker set that I used as a child.

Have you found a source for the plastic stoppers or perfect size cork to replace the ones that break on your salt and pepper shakers?

Sincerely, Emily

You can see what else I am up to over at Sincerely, Emily. The topics are varied, as I jump around from gardening to sewing to making bread or lotion and many things in between.

Read Full Post »

The celery leaf plant that I grew in the winter of 2011/12 did so well that this past winter I planted four of them. 4 nice celery leaf plants in the garden.

Celery Leaf Feb 2013

Celery Leaf Feb 2013

It was very easy to grow and I used it a lot in our green salads. stir fry and egg salad.

When the weather starts to warm up  I usually let several plants go to seed so I can collect the seeds to use the next year. The celery leaf was no exception. In fact, it is still sending up flower heads even though I haven’t been watering it. The bees and the butterflies continue to appreciate it.

Some of the seed heads have dried up and a few weeks ago I went out and clipped a few to collect the seeds for planting again this fall. The others, I just left out there. I had plans to get it pulled up and in the compost tumbler, but just haven’t gotten around to it. I am glad.

The one thing I didn’t connect the dots on was celery seed is celery seed! Not sure how I missed that…. but luckily some of my brain waves were firing last week when I was making up the dilled green cherry tomatoes . Celery seed was the one thing I added to Nancy’s recipe… so I guess it was in the front of my mind. Celery seed is celery seed.

Celery seed

Celery seed

I dusted off one of the screens for the drying rack and I marched back out to the garden with the clippers. I clipped several stalks of celery leaf with lovely mature seed heads. We had a sprinkling of rain that morning so those seed heads are quite wet. They are now resting on the drying rack, drying out a bit. I left several mature stalks out in the garden and will let them dry naturally before I cut and bring them in to dry out a bit more.

I have been watching the celery leaf go to seed for a few months. Somehow I never connected “celery seeds” to “celery seeds”

Am I making any sense?

Has something every stared you in the face for a while before you had the “ah ha” moment?

Sincerely, Emily

Read Full Post »

Older Posts »