Feeds:
Posts
Comments

Archive for the ‘Recyling’ Category

I am really tired of throwing away good money on cat scratching posts that don’t hold up very long. I have thought about re-covering the old, tattered, worn out ones for way too long….  I finally decided to do something about it.

in need of a makeover

in need of a makeover

The two girls have been really good about using the cat scratching posts over the course of their 13 years, until recently. One of them has decided to use the corner of a chair, so I have four cat scratching posts in that area AND SHE STILL GOES TO THE CHAIR! There is another scratching post in our bedroom that she uses A LOT and that is the one you see in the photo. It is long overdue for a makeover!

I removed most of the original sisal rope

I removed most of the original sisal rope

Why would I want to take the time to re-cover these scratching posts?

  • Frugal
  • It is really easy to do
  • Recycling some of the old (Yes I still had to buy the rope)
  • I am tired of spending money on something that doesn’t last very long anymore. (Scratching posts used to cost $20 or less, now they are closer to $30+
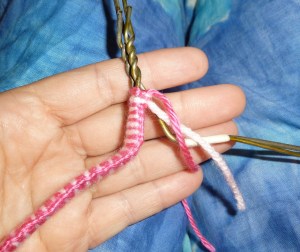
 

making progress

making progress

Supplies I needed:

  • Sisal rope
  • wood glue
  • blue painters tape or masking tape

I started by removing most of the older rope. I unwound the new sisal rope before I started so I wouldn’t be fighting with it as I needed it. Right away I could tell this was going to be a job that would go faster with three hand…. but I only have two. I applied glue to the round tube a little at a time. If I tried to glue a section, I just managed to get glue on my fingers and dripping off the tube, so i just glued enough to wrap the rope around once, hold it in place with my hand, then glue another ring.

When I would get a 6″ section done, I would then take the tape and go over it to help hold the rope in place until the glue dried. I am not sure I needed to tape the entire post, I could have used the tape every 3″ up the post and been fine I think. I will have to try that on the next post (I have a few more to do!)

Done!

Done!

I feel pretty good about how this project turned out. I fell better about being able to re-use most of the original scratching post and keep it out of the landfill. I also feel good about most of the supplies I used. I will take a bit more time to see if I can source some sisal rope made in the USA.

Have you taken on a project lately that has saved you money?

Sincerely, Emily

Read Full Post »

The entire East line of our property (300′) is full of cedar (Juniper) trees. They are wonderful because they help keep the morning sun off our house and that helps to keep things cooler for a while. They offer shade for some of the herb and flower gardens from the morning sun. They provide habitat for the variety of birds that live in our area. They also provide shade for the clothes line, because the hot Texas sun will fade our clothes rather quickly otherwise.

Chinese Pistache (Pistacia chinensis)

Chinese Pistache (Pistacia chinensis)

Around here, you will hear a lot of people say that the cedar (Juniper) are invasive. You will also hear them say the steal water for other trees and plants. Well, an invasive (to me) is an opportunist. It takes advantage of areas and will continue to grow and produce seedlings if the conditions are right. Back in the day when buffalo roamed our area, there were not a  lot of cedar (Juniper) trees. The buffalo hoof traffic kept the cedar trees under control. Since the buffalo don’t roam here anymore the cedar trees have taken advantage of the situation and now grow everywhere.

I am not sure if the cedar trees steal water from other plants, I do know that when it rains an inch, that all the leaves living on the tree soak up that water before it hits the ground. After that inch of rain, it is completely dry underneath the cedar trees. So, if that is “stealing,” then I guess they do.

As the trees get taller and older, the bottom branches die off.  Around our house, we have worked at trimming them off as they do that. The last few years we have noticed that more and more of the cedar are dieing and we find ourselves trying to come up with a plan to plant other trees amongst them to start growing and replace the cedars as they die.

You’ve probably heard the question, ” when is the best time to plant a tree?”…… answer: 10 years ago. Nothing grows real fast here, so had we been on top of this 5 years ago we would be that much more ahead of this game now. Well, we are not, so the best time to plant a tree for us is NOW.

We have four Chinese Pistache (Pistacia chinensis) in our yard. They are very established and are wonderful. One of them produced a lot of babies last year so I dug up several and potted them up to get them growing and last fall we planted four of them in the ground and they are doing really well. This spring I was able to dig up more seedlings and we will get them planted this fall. We also have a Vitex (also known as Chaste tree & VERY deer resistant) that is growing in the clump of cedar in the front yard. It does not get enough sun so it is rather leggy and scraggly, but we have taken out three cedars that were around it and it is starting to look a lot healthier now. Last Spring I found two babies under it and potted those up to get established. Last fall we planted those up near the front of the property line so that as we take out more cedar they will be growing up and provide us with some replacement trees and privacy.

front yard project 4This is an ongoing process. I am not able to head out with the chainsaw and trim cedar limbs or take down tress right now, so we are doing it as my husband has time. Normally, I would load the truck and take all the cuttings to the recycle place, but I just can’t do that yet either.

Several weeks ago my husband went on a trimming spree and we had 4 truck loads of cuttings that he took to recycle. On one of his trips he brought back a load of mulch. I had a plan to start planting more in the front section of our lot near the street and had picked up another Vitex and several ornamental grasses to go with a few agave babies from our neighbor. My husband dug holes and I helped him plant everything. Then I put out the paper feed sacks and we (he) covered that all with mulch. It is doing well.

You can see the area of cedar in our front yard and a few more dead trees that need to come out.

You can see the area of cedar in our front yard and a few more dead trees that need to come out. You can also see the Vitex blooming (light pink) in the background.

I have plans to create some sort of berm using some of the tree trimming and cover it with dirt and plant on and around it, but that is really going to have to wait until I am completely recovered so I can take that on myself.

My husband is really starting to see the urgency of getting other things planted as he starts to see how many of our cedar are dieing. I am grateful that he has had the time to help with the trimming and planting to move things along. It is an ongoing project, but it is nice to see some progress and some things taking shape.

Are you working on any yard projects?

Sincerely, Emily

Read Full Post »

Yesterday I posted about some free wood scraps (cut offs) that I got from a neighbor. Today I wanted to show you the benches that I made using similar scraps of wood.

Another, taller, bench

shorter bench -1I originally saw this bench design at my next door neighbors. He is the woodworker that I have posted about before (over at Sincerely, Emily) who makes wooden toys and the bus. He is very handy, and builds a lot of other things that they need or want around the house/property like a tall, large tripod to hang large wind chimes in or trellis for any vines. He also built a pergola off their screen porch and aviaries for their doves and another one for a parrot. Small scale or large scale, he has his hands in it and he has always had a pile of scrap wood to use along the way.

What is so great about these benches is that you can make them any height and any length. You just build them to fit the space you need to fill or the area you want to use them.

scrap wood

Using scrap lumberNot only can you make them to fit your space, but the scarp wood you use for the horizontal pieces on top can be mixed and matched. They can be 2×2’s, 2×4’s, 2×6’s, etc. I am definitely not picky and do not need them all to be the same. I love using the 4×4’s for the legs. They make the bench very sturdy and will take the weight of a lot of plants or a person if you are making it to sit on. The smaller tables my step-dad made for the laundry basket near the clothesline and the compost tumbler where made using 2x’6’s for the legs. Those tables do not need to support a lot of weight, so it was good to use the lumber scraps we had and save the 4×4’s for the plant benches.

Small table at clothesline

I put a piece of concrete under each leg (look at first photo) to keep it off the ground and away from moisture so the leg won’t start to rot. Our ground has not been moist or wet very often over the past few years here in South Texas, but if I can help the legs of my benches last just s little longer, I will.

The pile of scrap wood I hauled home in November still sits and waits for me. I had planned to get a few benches made this winter, but that is one of those things “on hold”  until I get better and can do my own things again. (JD is you happen to be reading this, feel free to use that beautiful scrap lumber and build me a couple of benches!)

I have talked about how strange things get me excited, like free horse manure and free mulch. Well, you can add scarp wood (or cut offs) to that list.

What kind of neat free stuff have you picked up along the way?

Sincerely, Emily

Read Full Post »

Last fall when my niece was visiting us, we spent some time making cards (and doing many other things too.) At the end of our visit there was a lot of paper scraps and supplies spread all over my work table upstairs. My niece picked up a few smaller pieces of paper and asked about making some little cards with the left over scraps. What a great idea!

The tiny Valentine cards I sent to my two nieces were born from that idea. Using up the left over scraps.

paper scraps

I never throw my scraps away. They tend to come in handy at some point in my card making, and here I was digging through the plain paper scraps and designer paper scraps to make tiny cards. Now they have come in handy again.

For these tiny cards I used a heart-shaped punch and simply punches out the heart shape from the designer paper. I chose papers I thought each niece would like and tailored it to them with the colors. They can use these cards anytime of year to write a little note to a friend and it will be something special. YOu can even punch a hole and add a ribbon to turn it into a gift tag. The next time I do this I will cut the cards to size and punch out the design and also add a stamped element and let them each assemble their own like I did for my niece in this post.

Tiny Cards

Whether you use scraps of designer paper, old maps, scraps of fabric or even cards that you have received in the mail, this is one way to create another neat little card. A perfect way to reuse and recycle. I know I will be making more of these and including them in different gifts that I send to them.

Do you save scraps of paper or fabric with the hopes to use it later? Do you ever get around to using it?

Sincerely, Emily

You can see what else I am up to over at Sincerely, Emily. The topics are varied, as I jump around from gardening to sewing to making bread or lotion and many things in between.


Read Full Post »

Yesterday over on my personal blog I posted  a photo of a beautiful old hand-painted wooden tray that came from my mom’s side of the family. I also commented on how I love to be surrounded by “stuff,” meaning things passed down from both sides of my family, or my husbands family. These things bring a smile to my face and I have good memories of them.

Wooden Tray 1

I also mentioned that there are times I am bothered by the clutter around me. Not the clutter of things from the past, but the clutter of projects that I am in the middle of or hoping finish soon, even dishes that need to be done.

Yesterday came and I had a bit of motivation in me, instead of working on a presentation I have coming up in January, I tackled an armoire in our bedroom. Ok, part of an armoire. I have more clothes than I could even need or use and it was time to chip away and decrease the piles. About 2 weeks ago, I took several boxes of clothes and other things over to a thrift store  and it felt really really good. Today I managed to fill one trash bag full of clothes.

cleaning out the closet

These clothes have a lot of life left in them and I need to let them get on with it. Live their life. Move on.

I know when I am met by a bit of motivation, I need to run with it. I get absolutely not where when I am not in the mood and I also know that I need to tackle things like this in small steps or it becomes too overwhelming and frustrating and then nothing gets done at all. So, I was in the mood, had a bit energy and got a lot done.

A laughed a bit, because as I went through the clothes, ever single piece was something that was handed down to me, things I didn’t spend a penny on and I don’t think I wore any of them. I hope someone else can get some better use out of them. They certainly aren’t doing anybody any good folded up in my armoire.

I still have way too many clothes, but it fells good to go through some of it and move it out. This journey continues.

What do you find is the best way for you to clean out a bit of stuff?

Sincerely, Emily

You can see what else I am up to over at Sincerely, Emily. The topics are varied, as I jump around from gardening to sewing to making bread or lotion and many things in between.

Read Full Post »

Grams yarn hangersI am taking a chance and posting this before Christmas, hoping that my nieces are not reading! This is all about Gram’s hangers. Now, I know my Gram wasn’t the only person out there making these, but she was the only person out there making them for me when I was younger… hence, Gram’s hangars.

When I got a bit older (I’m guessing 10 or 12 years old), she taught me how to make them. I searched all of our closets looking for one of Grams hanger. Do you think I found one? NO!  I just wanted to look at it and work out how I was going to make them. Do you think I remembered how to do them?  Yes, and no! I worked it out rather quickly, but I knew mine are a bit different. In fact, when I took the hangars I finished to MN this past fall to wrap them up and stash them away for my nieces, my mom came in to see what I was doing and then started pulling hanger after hanger out of her closest. All Gram’s hangars! She has all of them! I couldn’t help but laugh.

Started at the base of the hookWhat I love about using these hangars is that my clothes don’t slip off the hangar (and I made them by recycling old wire hangars and gave them a new purpose in life)

You start with two metal dry cleaner hangers that are of equal shape and size.  Tape them together in a few spots so you are fighting to keep the hangars together as you are working your yarn around them. You need two balls of yarn. They can be the same color or different colors, that is completely up to you, but the yarn does need to be in balls (not skeins). I could not remember how much yarn it took to make a hanger, so I bought two skeins of blue (for one niece) and two skeins of pink( for the other niece) and started wrapping them into balls. Make your yarn balls a manageable size so you can handle it easily enough and not be fighting with it to get it through the triangle form of the hanger at each pass. I made two hangers for each niece and have TONS of yarn left over. I could probably make them two more hangers each year for several years and still not run out (and hope they still like the colors I have!)

Make a loop

Make a loop

I started at the bottom of the neck where the hanger branches out and the worked my way around the hanger ending up back at the neck and then worked my way up to the top of the hook and back down to the neck. I know working my yarn over the hook and back gave it a bit of extra bulk, but I didn’t want to end at the top of the hook and have loos ends and knots up there where it gets most of its wear as it is put on your clothes rod and taken off over and over.

pass you yarn over the hanger and through the loop

pass you yarn over the hanger and through the loop

Tie both balls of yarn onto the bottom of the neck of the hangers leaving about a 6″ tail to work with later.  You want to keep one ball of yarn on one side of you and the other ball of yarn on the other side of you. I hold the hangar between my legs so that my hands are free to work with the yarn balls. I will mention that the chair that I sit on in our living room is an old swan neck rocker. It has open arm rests which isn’t the best situation because there isn’t much room on either side of my body to rest the yarn balls without them falling through the arms rest, off the chair, and unrolling out on the floor.

Pull tight

Pull tight

To make a “stitch” make a loop with your yarn and then pass your ball of yarn over the hangar and through the loop. Now pull it tight. The tighter you pull the more loops you will need to make to cover your hangar. The loosen your “stitches” the lass yarn. I made mine rather tight. From time to time you can also push your “stitches” so they are tighter together also. There are no rules here, do what ever you are comfortable with.

You can do one “stitch” with each color yarn or more. I did one hangar with single “stitches” and the other with two “stitches” with each ball of yarn before working the other side.

used single stitches on left and double stitches on right

used single stitches on left and double stitches on right

I finished by knotting my ends together and leaving about a 6″ tail on each end. I added pom poms that I made out of the same yarn and used the tail ends to attach them to the hangers.

Crossing my fingers that my nieces will love them.

Have you ever made yarn hangers?

Sincerely, Emily

You can see what else I am up to over at Sincerely, Emily. The topics are varied, as I jump around from gardening to sewing to making bread or lotion and many things in between.

Read Full Post »

I really enjoy giving handmade gifts (like the fabric napkins that I posted about last December.) Those gifts are usually made by me. One of my nieces has a birthday at the end of November. In fact it was just a few days ago so I had to wait until it was passed before I posted about her gift this year.

Since she was very very young I have always made her pillowcases. A pillow case for each season plus summer, winter, fall, spring themed ones as well. I can still look into my magic ball and see more pillowcases in her future, but wanted to come up with something different for this birthday.

As I was snooping around a thrift store a few weeks ago, I saw a small jewelry box. It was pretty plain (sorry, I completely forgot the “before” photo) but it had potential. I knew I could give it a facelift, but it also appealed the the frugal and thrifty side of me as well.

My original plan was to paint the entire jewelry box white and then “white-wash” it with a metallic silver to give it some pizazz and sparkle. I started with the white. I found a can of white spray paint in our garage and decided to use it to make quick work of covering the whole box. It needed two coats and even then the spray paint wasn’t covering the wood very well.

not covering the wood very well at all

I decided to get out my acrylic paints and go for better coverage with those. That worked a lot better, but the spray paint left a glossy finish and the acrylic paints left a mat finish, so I knew then I would need to apply a clear glossy top coat in the end.

Once the paint was on it was time for the silver metallic “white-wash.” I started wiping the silver on and instantly was not happy with the look at all! It was not looking all shiny and sparkly like it was in my vision. As I wipe it off for the full “white-wash” effect, it even looked worse. Again, sorry, no photo because at this point I knew I wanted to get as much of the paint off as I could and needed to work quickly.

So I just took one huge step backwards and needed to paint those surfaces white again and come up with another plan. By the way, this was Tuesday and I intended to mail the box on Wednesday. Nope, that didn’t happen! Not with another coat of white paint, plus dry time, plus what ever design I was going to paint, plus dry time, clear coat, dry time – you get the picture. I knew if I wrapped it up in one of my fabric gift bags before it was completely dry that the bag would be stuck to the box when my niece went to open it – not good.

The jewelry box did have a cut design into the wood so I felt I was a bit limited and so I decided to follow that pattern with dots. Dots are super super easy to do, if you know the trick. Use the end of your paint brush – the end without the bristles. Dip it in your paint and then touch it the surface you want the dot on. The size of the end of your brush will determine the size of your dot. Be sure to do a few test dots before you do this on your actual project and depending on the medium you are using you may get 1-2 dots before you need to reload the end of your brush, or you may only get 1 dot. The silver metallic paint I was using was pretty thin, and I wanted a substantial dots with a sparkly impact, so I needed to dip the end of my brush in the paint for each dot.

I did get the front and top of the box done and was going to move onto the sides, but time was not on my side.

I hope that my niece will like her new jewelry box.

Have you ever given something old a much needed facelift?

Sincerely, Emily

You can see what else I am up to over at Sincerely, Emily. The topics are varied, as I jump around from gardening to sewing to making bread or lotion and many things in between.


Read Full Post »

I know they’ve moved me from Zone 5 to Zone 6, but I’m still planting based on the Zone 5 frost date of May 10.

I always plant a range of home starts, nursery starts (although fewer and fewer of those) and direct. I like to do traditional seed starting, and a little winter sowing.

The hardest part of all this is to make sure that you’re planting, first, in a way that doesn’t overwhelm you, and second, so that your seedlings are ready to plant out when the proper weather hits– the cool weather ones in early April, the tender solanums not until almost June around here.

I use the wonderful “seed stash” tool at MyFolia.com to keep track of my seeds, but it’s most useful as a database. While it lets you note when you should plant indoors, and transplant, it doesn’t yet have a reminder function, and anyway, a pop-up box on my calendar or desktop is not a useful method for me. I like something really hands-on and visual, that puts it all in one place at a time.

I’m pretty organized, plus like all gardeners I get antsy (plantsy?) in the middle of winter and start wanting to do something–anything–that seems like gardening.  I used to sort by date into planting pots, but they tip over and get out of order. It’s really not optimal.

So what I’ve developed is a seed keeper system, organized not by type, but by planting date and method. It allows me to select out of the larger seed stash the seeds I’m actually planning to plant, so I’m not constantly pawing through seeds trying to remember what to do, and  I have a beautiful basket woven from recycled materials that a friend got me from Ten Thousand Villages which is a perfect size.

Here’s the method:

Make a card divider with the planting date on it, and list under it the method (indoor, winter sowing, direct) and the seeds you’ll plant. Those seeds go in front of it. I have my cool-weather, long growing season ones starting Feb 15 (leeks, brussels sprouts), then nothing for about a month. Here’s what they look like (hmmm, March 20 is a little bit early for tomatoes, may have to redo that one):

I use them year after year. As you can see, I used some old fliers from one of my clients. If I was the entrepreneurial type, I’d probably propose that NDiN market these with a logo and a guide book for the different zones!

Once I have my cards worked out, I pull out my seeds, all organized by type (as you can see, this task is yet to be completed) and start pulling packets, to load into the planting system.

When it’s all ready to go, it looks like this:

Ready to go.

How do you organize for the planting season?

Read Full Post »

I’m elated to be joining the Not Dabbling in Normal group as a new contributor (look for me every other Saturday). I’m writing from the Southwest—a remote Texas town (population 49) where I have been homesteading on 5 acres for the past decade.

In my former life I was a botanist and graphic designer. My husband and I gave up the big city to live our dream of a sustainable, organic, rural life complete with animals, honeybees, a large garden and this old house. I suspect this may be your dream, too? I’ll be sharing the intertwining of joys and challenges that such an adventure brings!

Our area

Where the hill country meets the desert

For starters, there are only 4.4 people per square mile in my county, and it’s a 3-4 hour round trip drive to a grocery store, bookstore, Starbucks, or hospital–if that gives you some perspective of the ‘not normal-ness’ around here. We live without television (by choice), radio and cell phone signals do not reach us. DSL is a lifeline that thankfully keeps me connected to friends all over the world!

Not only do we live on the edge of a desert, we are in what is known as a ‘food desert’. This means that 100% of the population here has low (read: no) access to healthy food, according to the USDA. (You can explore food deserts on this nifty interactive map).

Even though many of the locals are descendants of the original farming pioneers, those skills were lost somewhere along the way as life ‘modernized’ to BPA-lined canned goods, frozen dinners, and fast food. We tried unsuccessfully for many years to get a farmers market started—to be sure there’s a desire for one, but unfortunately not enough growers are interested. And for several years after that we organized free monthly community workshops on organic gardening and homesteading, empowering people to produce their own wholesome food. A group of us still trade surplus.

Our garden last year

Our garden last year

During our long growing season (roughly 230 days) we have been able to produce most of what we eat (with the exception of grains) in our vegetarian diet. We’re used to going out in our garden and picking what we need for the next meal—you can’t get much more local than that! But after experiencing the worst drought on record this year—during which our well went dry for six months and our garden died—by necessity we’ve had to seek out (more distant than we would like) farmers markets to get by. Over the coming months, I’ll be looking forward to sharing some healthy, vegetarian cooking ideas with you.

Our eggs

Rainbow selection of our eggs

Bartosz the Buff Laced Poland

Bartosz the Buff Laced Poland

Our main source of protein is eggs. We sell eggs locally as a CSA.­­­ I am crazy about chickens and specialize in raising rare and unusual breeds. They make such wonderful pets.  Currently we have about 80 birds (all have names!)

We just finished building our breeding facility out of 90% recycled materials. I look forward to telling you more about these lovable creatures and giving you a tour of their nifty abode! I’ll be able to give you some tips along the way for creating your own poultry housing, especially on predator-proofing and passive solar considerations.

Oriole painting detail

Oriole painting detail

Besides the egg business, you’ll find me teaching guitar, dabbling in photography and creating all sorts of things–paintings, quilts, and jewelry. I invite you to look for my creations on Etsy, follow my gardening adventures on Folia, and read more about my homesteading life on the flowerweaver.

Until next time, keep dabbling!

–Sage

Read Full Post »

Real food, real gardening, real housekeeping. We’ve broadly defined “real” here as make it yourself, grow it yourself, source it yourself, do it yourself, but the whole concept is a minefield of an issue for people trying to step lightly on the earth.

Some of us live in suburban or rural areas, where one cannot easily reduce automobile use, or a city like Chicago which inexplicably doesn’t have city-wide recycling. There are options that are not open to us. I used to haul my recycling to a nearby suburb, but now they make you show a resident’s ID. My alderman suggested I take it myself 30 miles south to the city recycling facility. I asked him if I could deduct my time and mileage cost from my taxes, since I would not be receiving this service, which other city residents get. Some entrepreneur set up recycling bins in a nearby parking lot, but it’s always full to overflowing.

A lot of what we do vis a vis “green” living in America is based on perverse incentives. We make it easier to use gas through small cars, ethanol additives, and subsidized roads and pipelines, but insist that so-called public transportation like Amtrak and municipal buses show a profit. Which just encourages us to drive. We provide recycling and “post consumer” packaging, encouraging us to throw things away. We worship green space, discouraging the economies inherent in density.

I want to stop bringing stuff into my house. I want to live lightly on the earth as much as I can. So what can I do in the face of societal barriers to responsible sustainability?

Don’t take another single bag from a store
I mean it. Not a single one. Carry small bags in your purse and large bags in your trunk. Bring them with you into stores. ALL stores, not just the grocery store. You don’t need the plastic Macy’s bag any more than you need the plastic Safeway bag. Did you leave the bags in the car? Go back for them. Get to the check out without them? Wheel the unpacked groceries to the lot and pack them yourself. Better yet, encourage your city council to pass deposit laws–stores need to be charging for bags, or cities need to be taxing the stores for giving them away. Bags aren’t free. That cost is just being passed to taxpayers who pay for trash hauling and landfill.

Carry a hot cup AND a cold cup
I have yet to encounter a restaurant or even hot dog stand that won’t use the cup that I bring. If I don’t have the cup with me, I don’t get the drink.

Don’t buy it if you don’t need it
I counted and realized I have seven different types of personal cleaning products in my shower. My husband has four. You only need three– soap, shampoo, toothpaste, and I’m on the fence about shampoo and toothpaste. Look around you. What are you duplicating? What items have only one use?

Don’t buy it if it’s in plastic packaging
This one is hard. Really really hard. Everything is in plastic. When you start to try doing this, it gets kind of horrifying. I’ve started looking for products that are in boxes instead of plastic bags (like laundry detergent), or from shops that allow me to bring my own reusable containers (harder). I have started buying soap and bar shampoo from artisan makers; my supplier wraps it in simple brown paper lunch bags. No more plastic bottles into the waste stream.

Fix it
This will cost you. You can still get irons and radios and tvs and shoes and watches fixed. The problem is, these items are so cheap and available, that it can literally be a quarter the price to buy it new than it is to fix. If you really can’t get it fixed, find a repair shop that will take your broken item and drop it off. Don’t throw it away. Everyone in Chicago now knows to leave broken electronics and appliances on top of the trash dumpster, because scavenging businesses will pick them up and fix them.

Use less
In other words, lather and rinse. But don’t repeat.

What are you doing to really reduce your impact?

Read Full Post »